
Virtual Machine Software for Windows 8
Everyone come to a situation to run different OS on same PC. To everyone OS you need some partition for installing the OS, one partition for normal OS and Second for Virtual OS. You can do these by visualization, which is normally called as ‘virtual PC’ or a ‘Virtual Machine’. It’s a simple thing, which you can do easily without any worry.
For these you need and normal smooth running Windows 8 or 7 PC, then you to install Virtual Machine software.
Installation Steps of Virtual Machine software in Windows 8:
Step 1:
There are many software’s for Virtual OS creation. Best to go with “Oracle VM VirtualBox” which you can get from http://www.virtualbox.org/ site. Download and install it with very simple instructions on your PC.
Step 2:
After the installation of Virtual Machine software on your PC, run it. Then you come across with welcome window. To create, tap one click on the ‘New’ Icon. A window will appear titled ‘Create Virtual Machine’. Next type your required name for your virtual machine. The other details will be updated automatically. Then Click Next.

Step 3:
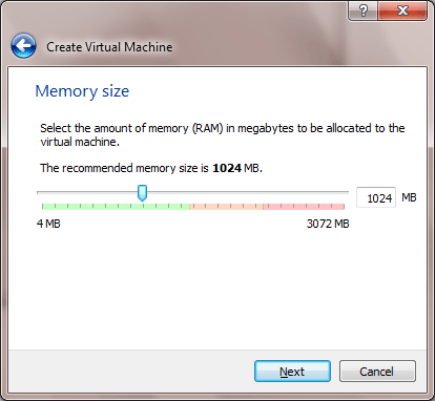
Now you have to allocate the RAM size for your Virtual Machine OS. From total RAM of your PC you have to allocate the RAM Memory size for Original OS and Virtual Machine OS. Then Click Next.
Step 4:
In the next step you come across hard driver memory allocation for which minimum memory size is 25 GB, it will varies with the total memory size of your hard disk. Then select ‘Create a virtual hard drive now’ option for your first installation on your PC. Then Click on Create button.

Step 5:
Next you come across hard disk file type window were Virtual machine OS can be saved in a particular format on your system. Now Select file type to which you want to be access your Virtual machine, its best go with the ‘VirutalBox Disk Image (VDI)’ option. Then Click Next.

Step 6:
In the next windows you come across Storage on physical hard drive windows in which you need to select ‘Dynamic Allocation’ or ‘Fixed Size’ file type, for description go with window screen, best to select Dynamic Allocation option. Then Click Next.

Step 7:
Next window is File Location and Size, where you need to type the virtual hard drive file name(you can create sub folder too) and select the hard drive file size in MB which is used to store your virtual machine OS files from available default size. Then Click Create Option.

Step 8:
Finally you have created a virtual machine OS on your PC. On the left hand side you can see the name of your machine and other details. However your machine is not works so, your machines status is shown as ‘Powered Off’. So turn it on you needs to click on the green arrow i.e. the ‘Start’ Button.

Step 9:
Next a new window appears which is the screen of your virtual machine. Ignore the error messages that might appear or else accept that error message and go on with next screen. Now you need to install an operating system. So select the image file where you have downloaded the OS on ‘Please choose a virtual optical disk file’ Window. After selecting he ISO file by browsing the file from your hard drive. Then Click Start Button to start virtual machine OS installation process.

Step 10:
Now with Window setup, windows 8 installation process will starts. Select the details as per your preference, then click Next.

Step 11:
On ‘Which type of installation do you want? ‘ windows, As you know there was no earlier Operating System on your Virtual Machine, so you now need to select the ‘Custom’ option. The process will take some time to complete.

Step 12:
With Windows successful installation you will see Windows 8 screen. There is no difference whatsoever. You can now use Windows 8 as you would normally do on a separate PC.

Step 13:
Now your Virtual Machine Software for Windows 8 is ready to use. All other settings will be saving automatically as normal windows system. To shut down your Virtual Machine then just hover over to ‘Machine’ Option on the VM VirtualBox and select ‘close’.
As now you can see a smooth running of windows 8 OS and you can install all your required software’s as normal system only. its all due to Virtual Machine software, so download the software and use dual OS in Single system.
